To get daily tips on Apple related products, such as Macs, iPhone, iPad, etc, check out our sister site Switching To Mac. Also, read our ultimate guide to taking screenshots in Windows article too.
Screenshots
Screenshots are basically a picture of the entire screen, or the entire desktop. Screenshots work by taking a shot of everything exactly how it is arranged, with active windows open and everything. For example, if you have Safari and iTunes open, but iTunes is active and Safari is minimized, a screenshot will take a screenshot of your Mac OS X desktop just as you see it. Alternatively, if you use COMMAND + CONTROL + SHIFT, 3 at the same time, Mac OS X will snap a screenshot and copy it to the clipboard, rather than save it to the desktop.
Screen Captures and Snippets
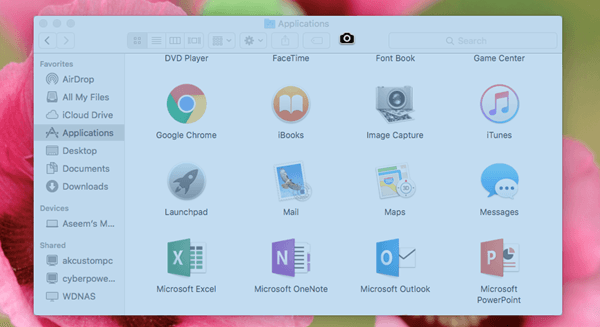
Screen captures and snippets are similar to screenshots in the fact that they take a photo of the active windows/desktop. However, they are also different because they allow you to specify a certain region or portion of the screen. Screen captures and snippets are basically the Mac OS X equivalent of the Sniping Tool, for Windows users. Press the key combo and drag to select the portion of the screen to capture. Alternatively, if you use COMMAND + CONTROL + SHIFT + 4 at the same time, Mac OS X will copy the snippet to the clipboard rather than save it as an image to the desktop. Additional Mac OS X screenshot shortcuts: This takes a screenshot of an individual window and saves it to the desktop. Note that you only have to hold down CMD, SHIFT and 4 together, but can then let go of the keys and press Space separately. You can then click on any window to capture a screenshot. The cursor will also turn into a camera icon when you press Space.
Takes a screenshot of an individual window and copies it to the clipboard.
Screen Capture with Cursor
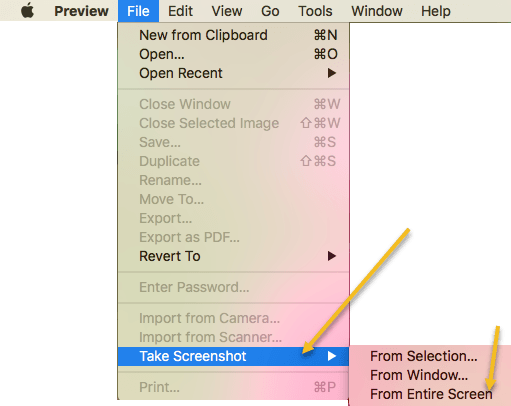
If you want to capture a screenshot in OS X with the cursor, you have to use Preview. None of the shortcut keys allow you to capture the cursor by default. Open Preview and then click on File – Take a Screenshot – From Entire Screen.
A countdown dialog will appear and after a few seconds, the entire screen will be captured along with whatever the current cursor is. Some websites say to use the Grab utility, but using that tool, you have to pick the cursor you want captured whereas Preview will capture whatever the current cursor is.
Screenshot of Touch Bar
If you have a Mac with the new Touch Bar, you can easily take a screenshot by using the following key combo: The screenshot will automatically be saved to the desktop as a PNG file.
Screen Recording
In some circumstances, you may want to do a screen recording rather than capture still frames with a snapshot. For example, screen recordings are highly popular for video tutorials. In Mac OS X, screen recording is actually quite easy. No software downloads required.
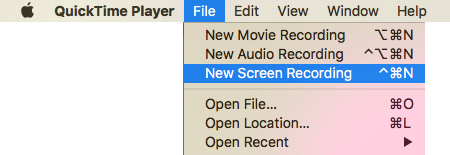
Navigate the path Finder > Applications > QuickTime Player. Double click the QuickTime Player icon to launch QuickTime Player. With QuickTime active, select File > New Screen Recording.
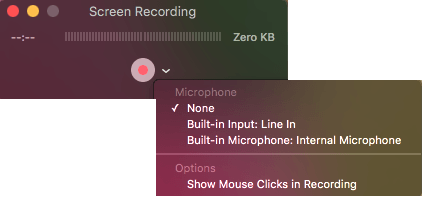
Click the red record button on the Screen Recording tool. You can also click on the dropdown arrow and choose a microphone if you want audio in the recording. You can also capture the mouse clicks in the recording too.
Read over the general guidelines and click anywhere on the screen to record full screen. If you want to record just a portion of the screen, click and drag your mouse over the area. To to stop recording, click the Stop Recording icon in the menu bar. OR Press COMMAND + CONTROL + ESC.
Those are pretty much all the ways you can capture a screenshot in OS X without using third-party software. If you need more advanced editing features, etc., then I would suggest Snagit for Mac. Enjoy!
