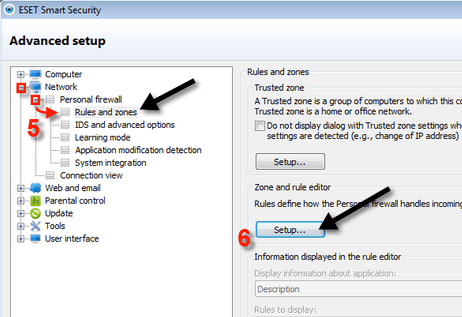
Whoops! That definitely didn’t sound too good. A DNS cache poisoning attack is basically the same thing as DNS spoofing, which basically means the DNS name server cache has been compromised and when requesting a webpage, instead of getting the real server, the request is redirected to a malicious computer that can download spyware or viruses to the computer. I decided to perform a full anti-virus scan and also downloaded Malwarebytes and did a scan for malware too. Neither scan came up with anything, so then I started doing a little bit more research. If you look at the screenshot above, you’ll see that the ‘remote’ IP address is actually a local IP address (192.168.1.1). That IP address actually happens to be my router IP address! So my router is poisoning my DNS cache? Not really! According to ESET, it can sometimes accidentally detect internal IP traffic from a router or other device as a possible threat. This was definitely the case for me because the IP address was a local IP. If you get the message and your IP address falls in an of these ranges below, then it’s just internal traffic and there is no need to worry: If it’s not a local IP address, scroll down for further instructions. First, I’ll show you what to do if it’s a local IP. Go ahead and open up the ESET Smart Security program and go to the Advanced Settings dialog. Expand Network, then Personal Firewall and click on Rules and zones.
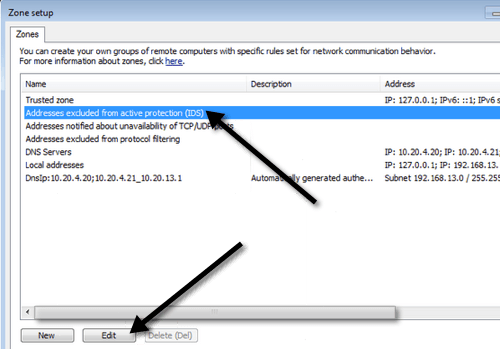
Click on the Setup button under Zone and rule editor and click on the Zones tab. Now click on Address excluded from active protection (IDS) and click Edit.
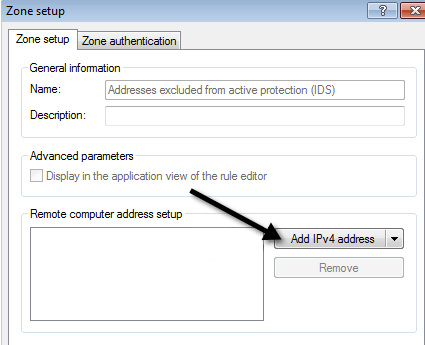
Next a Zone setup dialog will appear and here you want to click on Add IPv4 address.
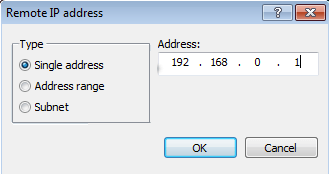
Now go ahead and type in the IP address that it listed when ESET detected the threat.
Click OK a couple of times to go all the way back to the main program. You should no longer get any threat messages about DNS poisoning attacks coming from that local IP address. If it’s not a local IP address, that means you might actually be a victim of DNS spoofing! In that case, you need to reset your Windows Hosts file and clear the DNS cache on your system. The folks at ESET created an EXE file that you can just download and run to restore the original Hosts file and flush the DNS cache. https://support.eset.com/kb2933/ If you don’t want to use their EXE file for whatever reason, you can also use the following Fix It download Microsoft to restore the Hosts file: https://support.microsoft.com/en-us/help/972034/how-to-reset-the-hosts-file-back-to-the-default To manually clear the DNS cache on a Windows PC, open the command prompt and type in the following line: Normally most people will never be victims of DNS spoofing and it may be a good idea to disable the ESET firewall and just use the Windows firewall. I personally have found that it brings up too many false positives and ends up scaring people more than actually protecting them. Enjoy!


