Luckily, Microsoft provides all the parts for remote desktop to work properly between a Mac and a PC. In this article, I’m going to walk you through the steps for setting up remote desktop on a Mac and PC.
Setup Remote Desktop Assistant on PC
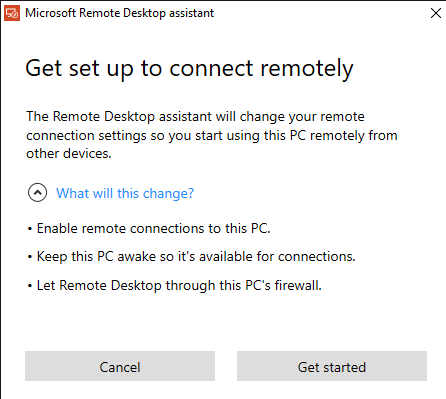
The first thing you’ll need to do is setup remote desktop assistant on your PC. This program will basically enable remote desktop, open the ports in the firewall and configure anything else that is required for remote desktop. When you download the file and run it, it’ll ask for your permission to connect to the Internet to download all the setup files. Once you approve that and the program is installed, go ahead and run it.
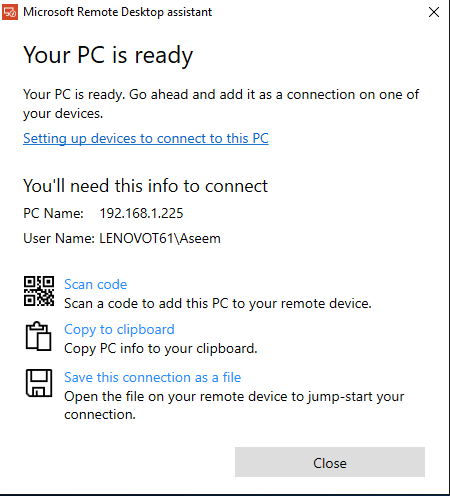
It’s a very simple and straight-forward program. All you do is click Get Started and it will change a few settings on your PC so that the computer can accept incoming remote desktop connections. Once completed, it will show you a summary and give you the option to scan a QR code (if using a mobile device like an iPad), copy the info to the clipboard or save the connection as a file, which you can open on another computer.
Once you have the info you need, go ahead and close the window. It’s worth noting that if you want to connect to your computer from outside the local network, you’ll have to open the ports on the router manually and forward those ports to your PC. You’ll also have to setup dynamic DNS so that you can use a DNS name rather than your public IP address, which changes often, to connect. It’s definitely more complicated, but totally doable.
Setup Remote Desktop on Mac
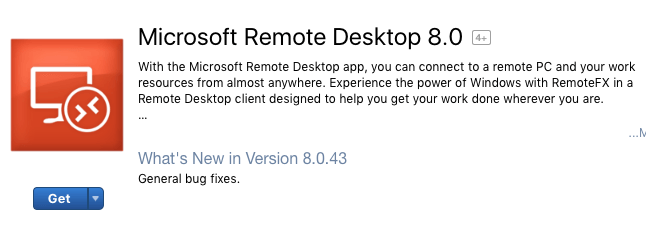
Now that you are setup on the PC side, it’s time to get remote desktop installed on your Mac. You’ll want to go to the App Store and search for remote desktop. The first app should be Microsoft Remote Desktop.
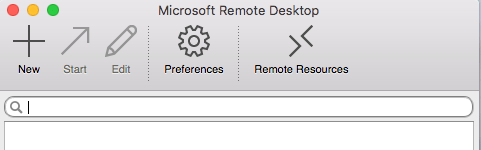
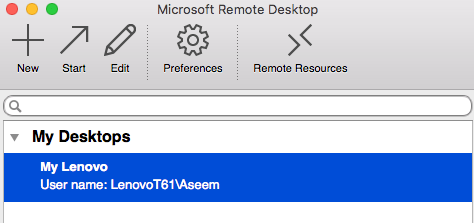
Click the Get button and once downloaded, click the Open button. The main screen is just a couple of buttons across the top: New, Start, Edit, Preferences and Remote Resources.
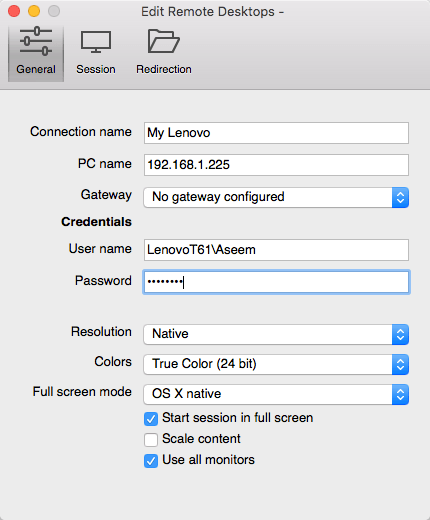
Click on the New button to start a new remote desktop connection. Here you will type in all the information that was listed out on the PC when you setup remote desktop assistant.
Give your connection a name, type in the IP address under PC Name, configure a gateway if required and then type in the credentials for the remote PC. Note that the PC will need to have an account with a password in order for all this to work. If the account doesn’t have a password, you won’t be able to connect. Also, to save the connection, you just have to press the red X button at the top left of the screen. For some odd reason, there is no Add and Save button on the dialog. However, once you click the X, you’ll see the new connection listed.
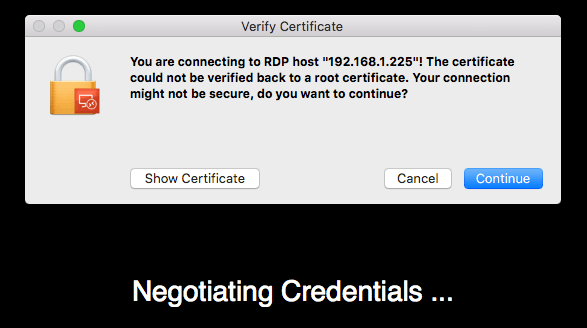
Click on it and then click on Start to connect to the remote PC. You’ll probably see a warning about the certificate not being verified, which is OK. Just click Continue to make the connection.
That’s about it! After a few moments, the PC desktop should load full screen onto your Mac. If you need to make any changes to the connection, just select it and click on Edit. Also, you can click on Preferences to add a gateway or to specify the display resolution manually. If you have any trouble, let us know in the comments. Enjoy! Bonus: If you use Google Chrome a lot, you might be interested in knowing that you can access any PC (Linux, Mac, Windows) remotely using just the Chrome Remote Desktop extension from Google.