I had no clue what that meant, even though changing the permissions fixed the problem. I’ve now realized Linux permissions aren’t all that complicated, you just have to understand the system. In this article, I’ll talk about Linux permissions on a high-level and show you how to use the chmod command to change permissions for files and folders.
Linux Permissions & Levels
In Linux, there are basically three permissions that you will normally have to worry about: read, write and execute. All three of these are pretty self-explanatory. Now when these permissions are applied to a file, they are applied in levels. There are three levels of permissions in Linux: owner, group and other. The owner is the user who owns the file/folder, the group includes other users in the file’s group and other just represents all other users who are not the owner or in the group. Read, write and execute are represented as either symbolic characters or as octal numbers. For example, if you do a ls -l in a directory with some files, you’ll see the symbolic character representation of the permissions.
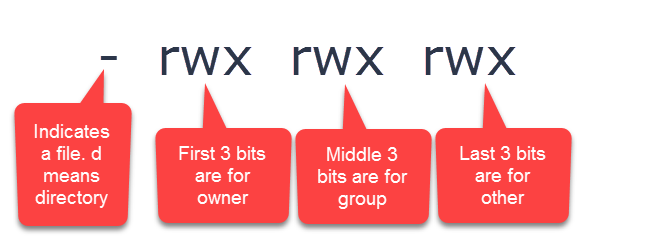
The permissions are written as follows: the first bit is either a dash or the letter d. Dash means it’s a file and d stands for directory. Note that the first bit can also be an l if the file name is a link. Next, there are three groups of three bits. The first bit in each group is for read, the second bit is for write and the third bit is for execute. The first three bits are for the owner, the second three bits are for the group and the third three bits are for other. Here’s a more visual explanation.
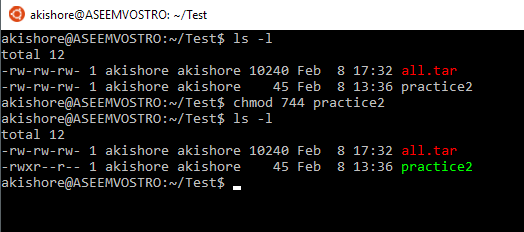
If you see a dash in place of a letter, it means that the owner, group or all other users do not have that permission. In the example above, the owner, group and everyone else has read write and execute permissions. If you look at the output from the ls -l command, you’ll notice that my practice text file has the following permissions: This means that everyone only has read/write permissions for the file. Here’s another example: Looking at the first bit, we can see that the permissions are for a directory. The owner has read/write/execute permissions, but the group and other users only have read permission.
Octal Number Representation
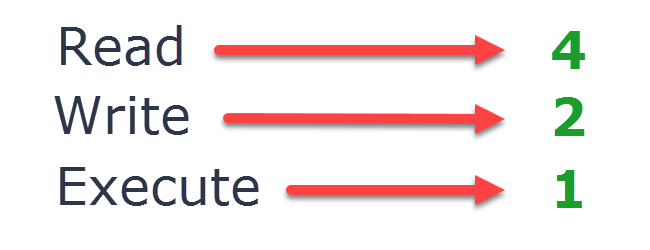
So that’s how permissions are displayed in Linux using symbols. The second way to represent the same permissions is by using octal numbers. When we use the chmod command later on, you’ll see that you can change the permissions using either symbols or octal numbers. So how does Linux represent read, write and execute using octal numbers? Basically, it just assigns a number to each permission as shown below.
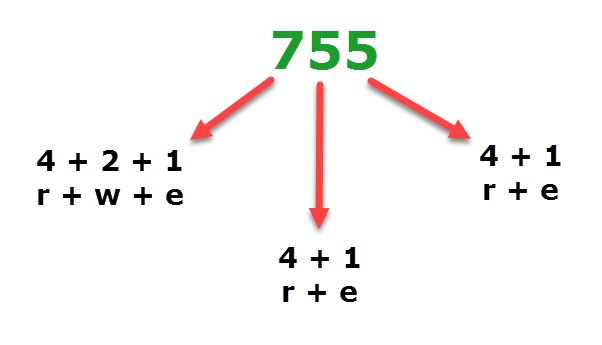
The read permission is represented by 4, write by 2 and execute by 1. All you have to do is add them up to get the octal permission. For example, let’s take the example above where everyone has all permissions: The owner has rwx, so we will add 4 + 2 + 1 to get a value of 7. We do the same thing for group and the same thing for other. The final octal value is 777. Let’s take a look at the example where we only gave read/write permissions: The first octal number will be 4 + 2 since we are adding read and write. The second one will be the same as will the third octal number. Here we have a final octal value of 666. So now let’s try it the other way. Say we want to know what permissions 755 represents? Well, it’s pretty easy to figure out if you break it down by individual numbers. The first number is 7, which we can only get by adding 4 + 2 + 1, meaning the owner has read/write/execute permission. Five can only be gotten by adding 4 + 1, meaning the group and other users have read and execute permissions.
Hopefully, that’s a good explanation for how to represent permissions in Linux using octal numbers. It’s pretty straight-forward overall.
Using chmod to Modify Permissions
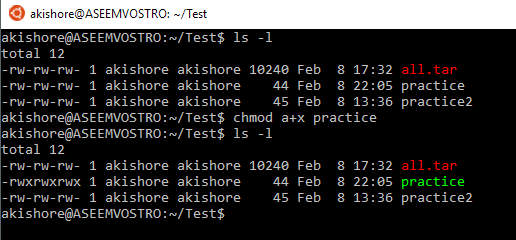
Now that we understand how to read permissions, let’s talk about how we can change them. The easiest utility to use for this purpose is the chmod command. Here’s how it works. The best way to explain the command is to go through an example. Let’s start with the permissions we talked about above, namely: If we wanted to add the execute permission for owner, group and other, we could go about it in two ways. We could use the symbol method or the octal method. For the symbol method, we would do the following, as shown below:
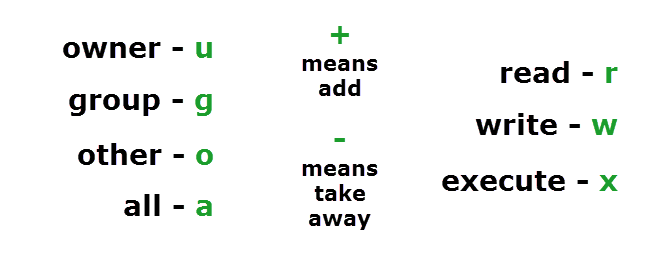
The exact command is The syntax is as follows: the letter or letters representing the owner (u), group (g), other (o) or all (a) followed by a + for adding permissions or a – for taking away permissions and then the letter for the permission (r for read, w for write and x for execute). In the above example, I added the execute permission for all users. The result as you can see in the screenshot above is an x for owner, group and other. Now let’s say I wanted to remove the write and execute permissions for only the group and other users.
As you can see here, I used to the following command to accomplish this: Since I want to change the permissions for group and other, I use the letter g and the letter o. I want to remove permissions, so I use the – sign. Finally, I want to remove the write and execute permissions, so I use w and x. Here’s a handy little table for symbol usage:
So that’s all there is to using the symbol method. Now let’s talk about the octal method, which I find to be a bit easier. Octal is nice because you can add or remove permissions all in one go. If we start with the following permissions on a file, let’s see how we can change them using the octal method:
Above, you can see I used the following command: This basically says the owner gets read/write/execute permission and the group and other gets read permission only. As you can see, it’s easy to add or remove permissions in one simple command. Let’s keep going and say I want to change permissions again.
Now I used the following command, again a very simple one: Here we have given the owner read/write permissions, the group read permission only and the other group no permissions. You use a zero to denote no permissions. Pretty simple, eh? In conclusion, this is a very simple overview of Linux permissions and it can get a lot more complicated than this, but for beginners, it’s a good place to start. I’ll be posting more articles on more advanced permissions in the future. If you have any questions, feel free to comment. Enjoy!

